Showing posts with label DIY Crafts. Show all posts

Wednesday, March 20, 2013

Calendula Oil

I like to keep things natural!  It is such a wonderful thing to learn new skills and ways of creating things.  I have found such satisfaction in doing things myself instead of just reaching for something off the shelf that was made from who knows what and then paying for it.  Over the last few years I have made diaper cream, sun screen lotion, recrafted soap, body cream, laundry soap, scouring powder - and just recently I made my own shaving cream and tooth"paste"!  There are so many more things I'd love to try!

I've also been learning a lot about different herbs and uses for them.  It was so great to see Chloe running out to get plantain last fall for a small cut :)  I put some of them into olive oil and then used them in my creams.  One of them is calendula.  I grew this calendula myself.  I didn't have lots of plants, but boy did I ever get lots of petals from them!  Every time you take one off it grows more!  So throughout the summer my small patch kept giving and giving.

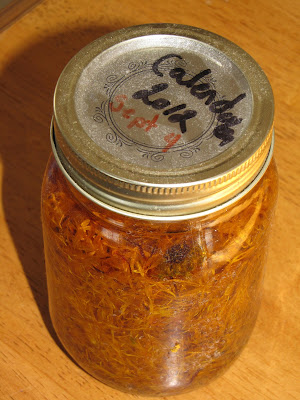
Yes it is dusty on the lid.  I on purpose did not remove it before taking the picture!  I put the calendula and oil in that jar on Sept. 4 of last year, put it up on a high shelf where it would stay warm but out of direct sunlight and then neglected it.  I already had some calendula oil that was ready that I was using for creams so this one just sat there.  As I was cleaning up the last of the pumpkins that I had sitting there beside it I decided it was time to take it down!  I strained the oil off and this is the result:

Isn't it pretty? I just love looking at the beautiful colour it made!  From a green extra virgin olive colour to this orange :)  I promptly used some in Kara's bath water.  Not so great for the bath toys but wonderful for her skin! I also applied it to her diaper area when she had some sore skin.  I have also used it in making diaper creams. 

You can also use calendula in cooking and as a tea, but I haven't used it that way yet.  

The next way I want to use it is as a facial toner!  Being pregnant has not done wonders for my skin at all and I've heard very positive reports from people who have done oil cleanses on their face.   Between the oil and calendula's healing properties maybe my skin will improve :)

And just for fun here's a few recent pictures of my sweet kiddos :)

 She absolutely loves her baby :)

 So proud of herself for making her own toast :)

Having a blast outside.  He just loves the outdoors!

Daddy made it home just before they were in bed one day last week and they were so very happy to see him!  I don't think Kara stopped squealing until she was in bed :)  TR has been working so much lately and what a real treat it was that he could kiss them goodnight - and toss them in the air and throw them on the couch and tickle them breathless first of course :)
Thursday, March 14, 2013

Newborn Diapers!!!

The newborn diaper covers I ordered have come in!!!  A little surreal :) 

I am very excited to begin with cloth - I'm sure we'll still use disposables from time to time, but hopefully these diapers will fit the baby.  My girls also really love the diapers and had so much fun putting them on their baby's (Kara needed a little help of course :).  Benjamin didn't seem to excited about them, but that's just the way it is.  Girls just love babies :)  And my girls are no exception. 

Kara's doll is wearing the new diaper cover and Chloe's doll is wearing the Baby's new sleeper,
with a diaper underneath of course :)

In other news I have finished Baby's blanket!  Hurray!  And with lots of time to spare - it is still cold and miserable outside.  So now I am thinking about doing a few other sewing projects before Spring hits.  I'm dreaming of making the baby some new fitted diapers and using some old wool sweaters I found at a yard sale last Fall to make some covers or pants.  I did actually make 1 new fitted diaper a few days ago and am itching to get it out again and make some more! 

I must admit that I love how the blanket turned out.  I really wasn't sure when I picked out the scraps - but it turned out so great!  Never mind that the elephant somehow moved while I was stitching it on (I guess he wants to walk downhill?) or that the quilting of the three layers caused some bunching.  It is perfect and it feels so cozy, not stiff, but soft and perfect for wrapping our sweet babe in!   Now it just needs a few times through the wash to get that awful stinky laundry soap out (whatever these scraps were laundered in before was obviously chemically scented, yuck!) and hung out to air for a few days and it will be ready :) :)

Tuesday, March 12, 2013

Adding Sleeves to Gloves/Mittens

I know it is almost Spring and we're all waiting ever so anxiously for the snow to melt - but I've been wanting to post this for a while and if I wait until next Fall to post this  . . . well, you know how life with a new baby is!  It will probably never get posted :) So here it is!

How to Add Sleeves or extensions onto your childs (or yours if you want them) gloves or mitts:

1. Find some old socks.  I used some of my wool socks that had holes in the toes but the rest of the sock was still in great condition.  I'm sure that any sock will do, but warmer is probably better.  Also it's good if it will be big enough to fit over your child's jacket sleeve. (I ended up just using the two pairs on the right).
2. Cut the foot off of the sock.  For Benjamin's I cut off a lot more and left Chloe's longer, although in hindsight I left Chloe's too long.  The length of Ben's is pretty much perfect. (pictured here are the ones I cut for Chloe - they could've been shorter)

3. Fold the sock piece inside out and stuff it inside the glove.  Make sure that the finished side of the sock is on the inside so that you are sewing on the raw (cut) side of the sock. 
4. Using needle and thread sew the sock and glove together. 
Chloe helped me sew them together. 
5. Repeat for remaining socks/gloves.  It hardly took any time at all!  I am actually a little surprised at how quickly I was able to finish them. 
6. Wear them outside and have fun in the snow!  You can either wear them over the jacket sleeve or underneath. 


I am so very pleased with how they turned out! My kids have been wearing them for the last 3 months and they are holding up very well.  I used to have to readjust their mitts all the time while they were playing outside.  They used to complain that their hands were cold.  Now they play outside for a long time and say they are warm.  Their mitts never have to be readjusted and I didn't have to spend any more money on different gloves!

p.s. The inspiration for these sleeve additions came from a lady in Church who had bought gloves for her girls that looked like they had baby warmers attached to them.  I'm sure that reusing your own baby warmers would also work really well.